
The old Land Rover Defender is one of those vehicles I’ve occasionally seen on the trail, but never laid hands on. As time has passed, values have shot so far up into the stratosphere that most have become pampered driveway decorations. My neighbor two streets over has a 1990s Defender 90 2-door like that, and he was also the first in my area that bought a new 2020 Land Rover Defender 110 4-door.
Parked next to each other, the differences were plain to see as I repeatedly studied them on my regular evening walk. The stylists of the new Defender 110 did much to capture the essence of the old icon, but there’s no denying his restored Defender 90 is a brute by comparison. By far the biggest difference is the suspension, which on the old truck consists of solid front and rear axles and coil springs — much like a Jeep Wrangler or a similar-vintage 80-series Toyota Land Cruiser.
The new Defender, on the other hand, rides on a unibody chassis that is propped up by four-wheel independent suspension and air springs. This makes it a much better vehicle to own as a daily driver, but it also sacrifices some hardcore off-road capability. What have they done, exactly? I recently got my hands on a 2020 Land Rover Defender 100 SE to find out.
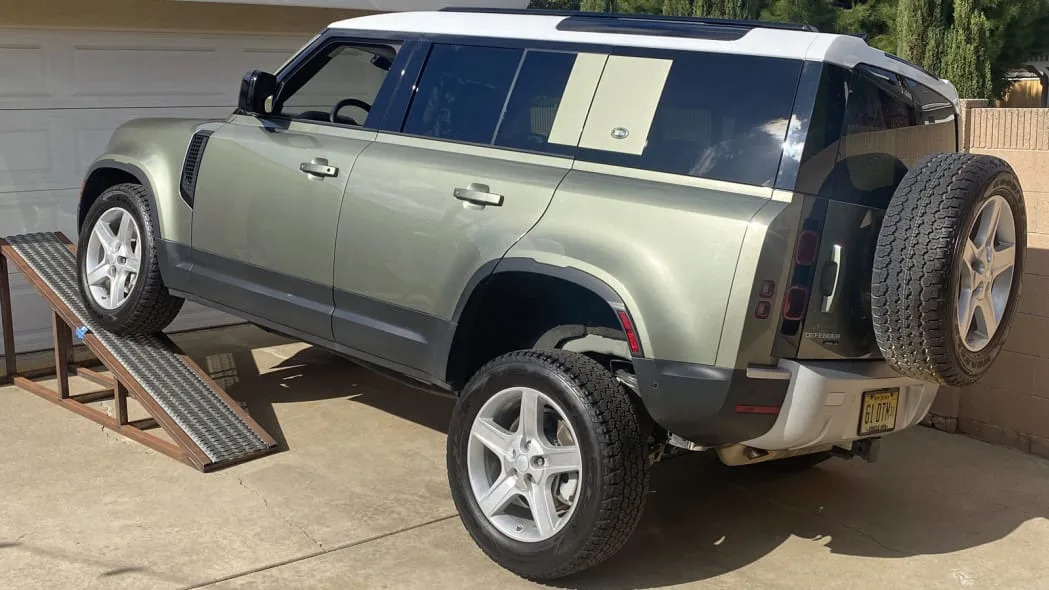
Before I really got started, of course, I drove it up my RTI ramp. I measured a score of 486 points. Land Rover does not specify articulation in terms of RTI score, but they do say the maximum articulation is 19.7 inches. I take that to mean wheel lift on a ramp like this, which is what I measure. Running their number through my formula, which factors in the Defender 110’s actual wheelbase of 119 inches, I get 484 points.
So my measurement is basically spot on, but I must point out that my own 4Runner can manage 555 points in this test.
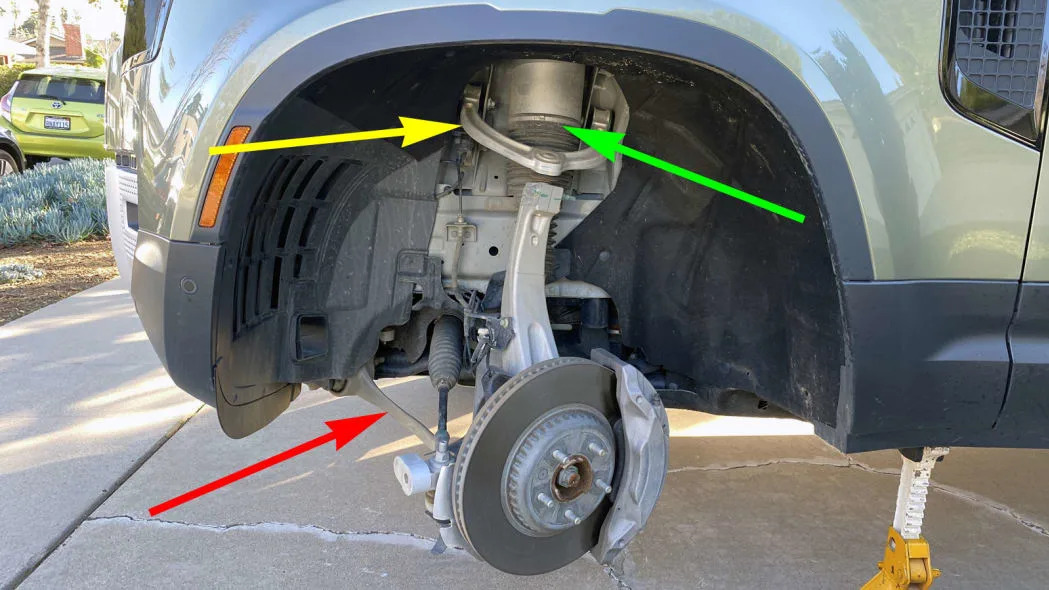
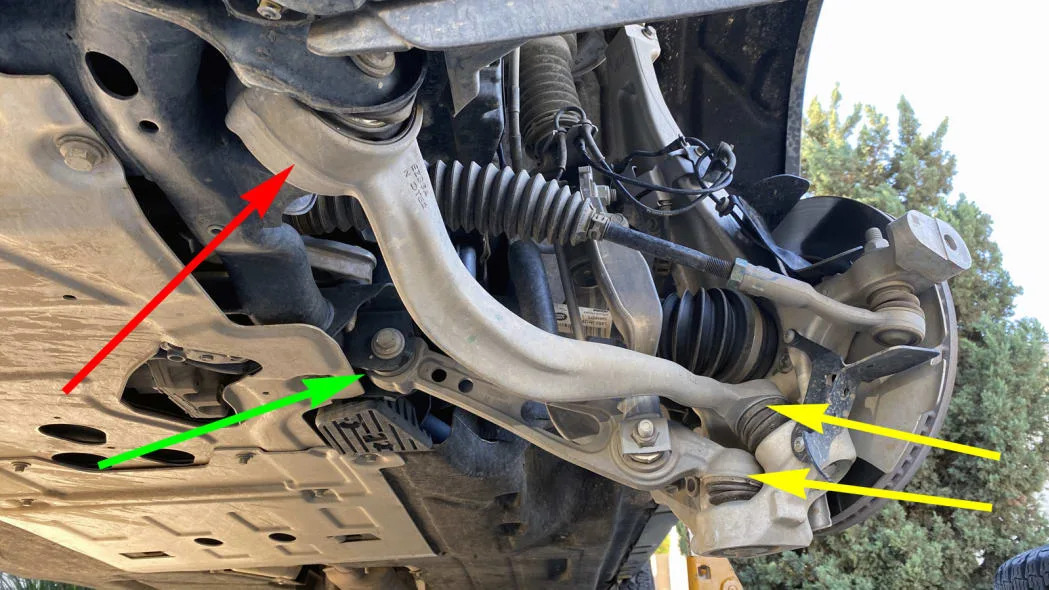
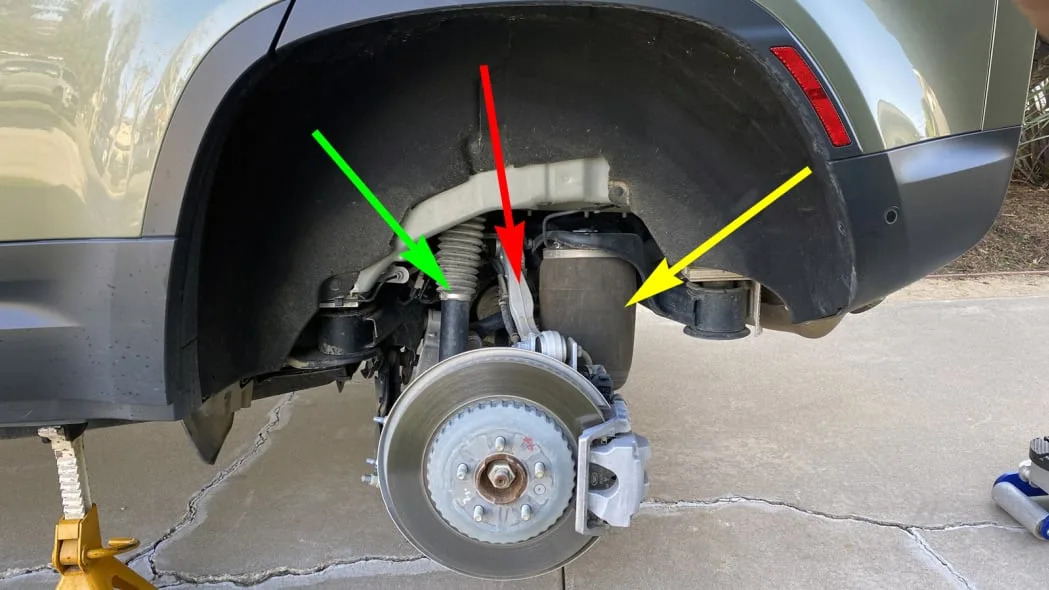
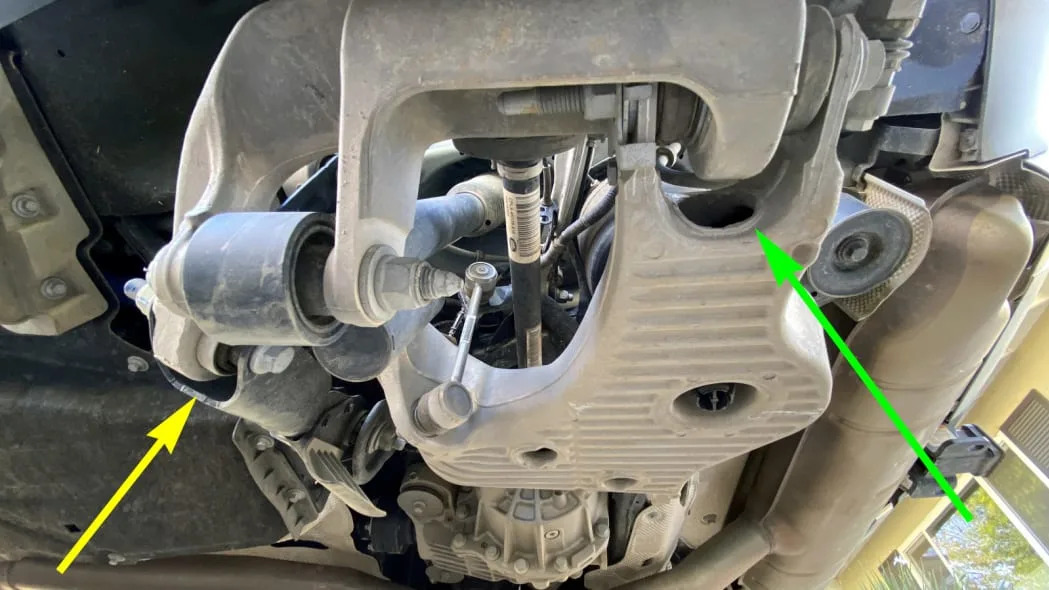
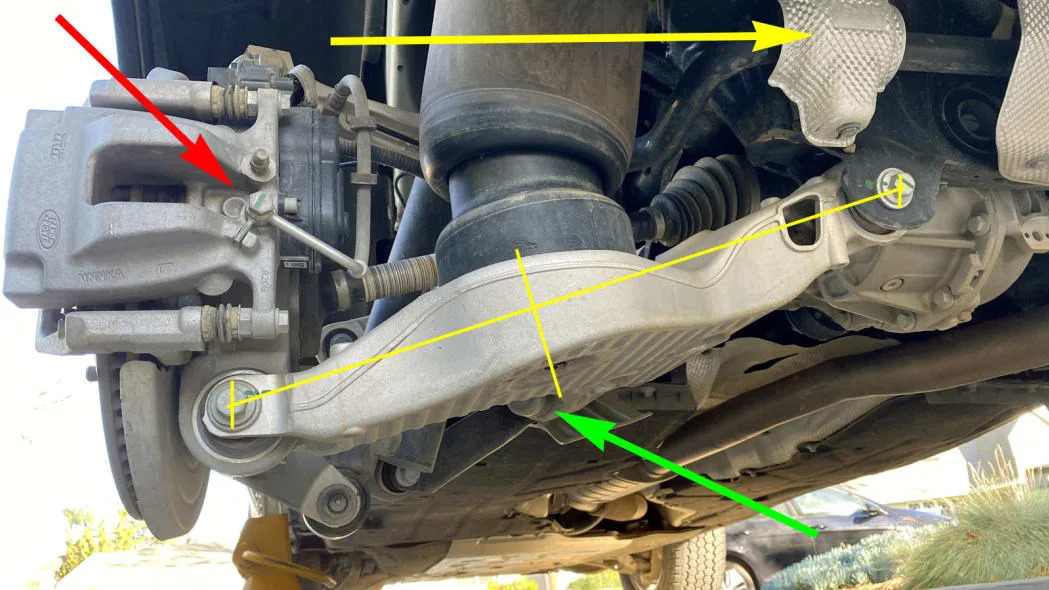
Up front, the Defender 110 rides on what looks like a double wishbone front suspension with a very high-mounted upper control arm (yellow arrow) and an air spring (green). It’s similar in concept to the newest iterations of the Range Rover and Discovery. But is the lower arm (red) really a single wishbone?
No. It’s a dual-pivot arrangement with two discreet links (green), each with their own outer ball joint. That’s not much of a surprise, because that’s consistent with what we’d find on the Range Rover and Discovery. Higher up, the air spring completely envelops the electronically adjustable damper (yellow), which bolts to an aluminum fork (red) that splits around the drive axle before it bolts to the lower lateral link.
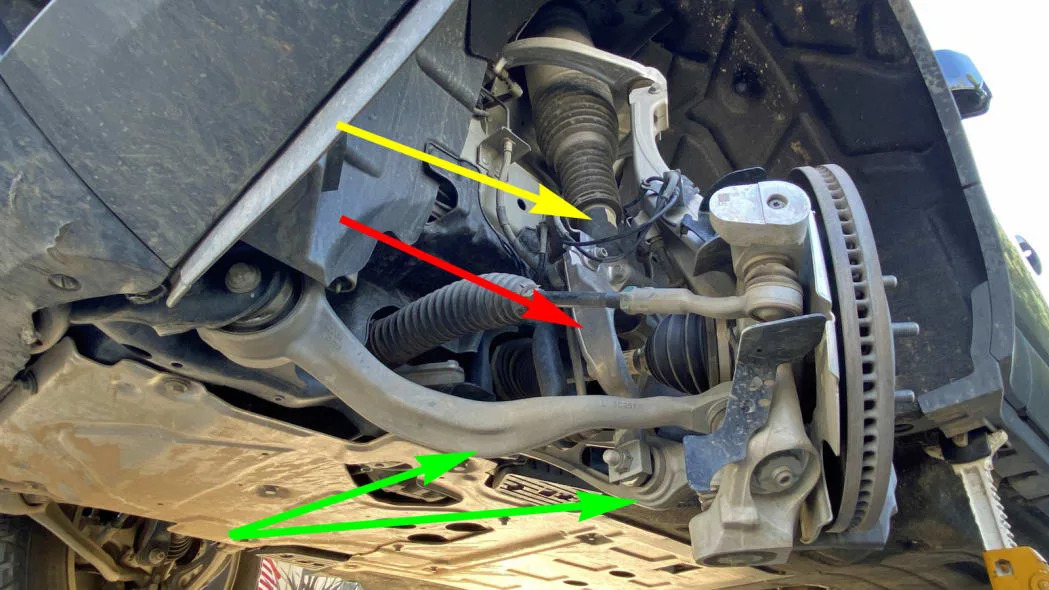
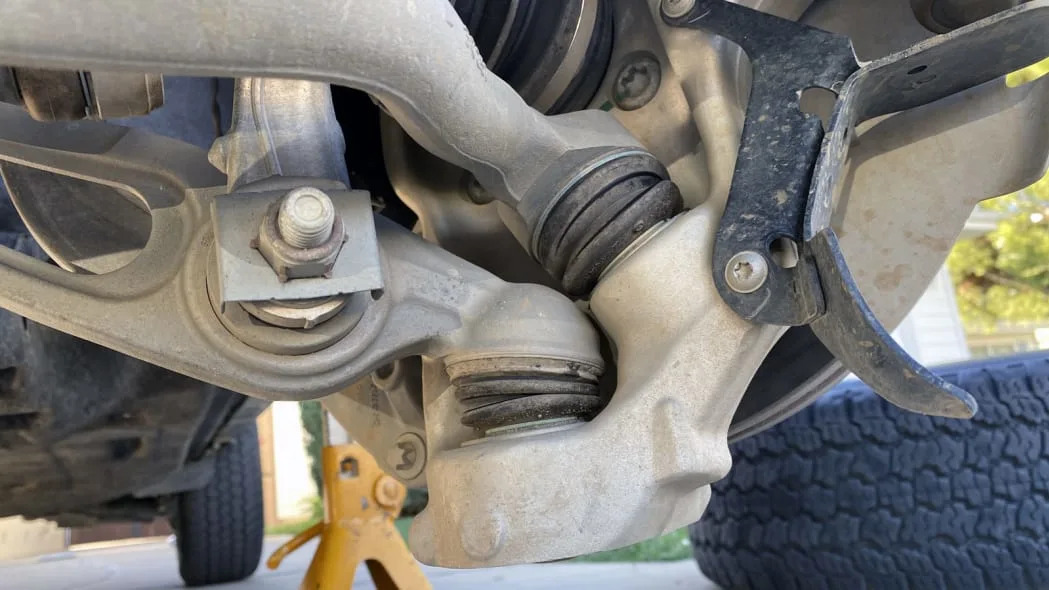
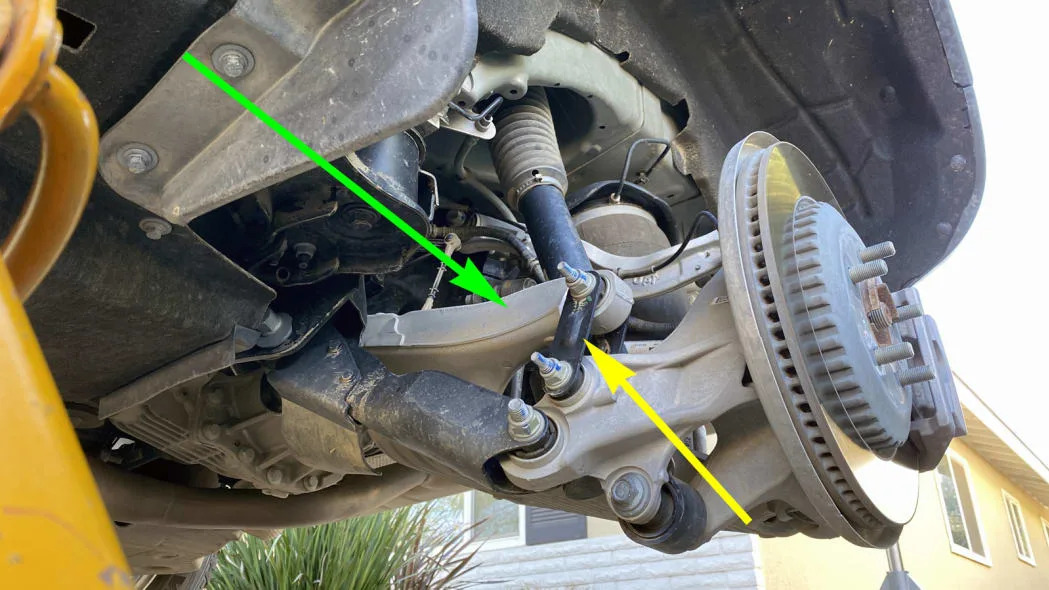
It’s a bit easier to see the two lower links and their individual outer ball joints (yellow) here. This arrangement moves the steering axis to a virtual pivot outboard of the two physical pivots, to a point that’s closer to the inner edge of the brake rotor than is physically possible.
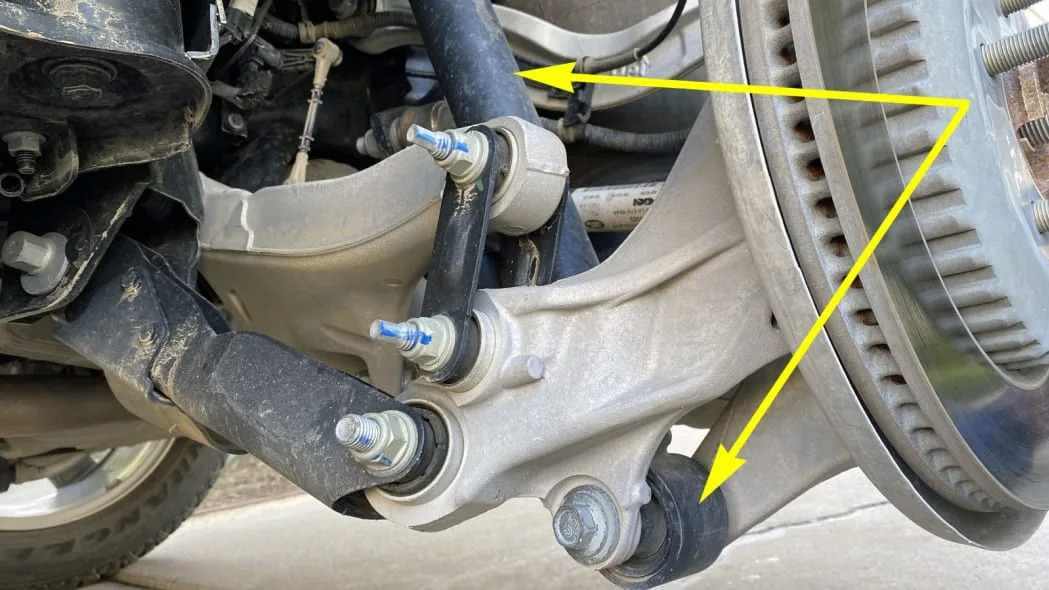
The lateral link feeds cornering loads into the chassis through an inboard pivot bushing (green) that is fairly small and rigid. Meanwhile, the angled forward link is more concerned with bracing the wheel in the fore-aft direction. Its inboard pivot (red) employs a larger-volume bushing with softer rubber that is designed to take the harsh edge off the rearward component of encounters with potholes or off-road rocks.
The two links are stacked one above the other in close proximity, which indicates the engineers were not trying to move the virtual pivot point a great distance. What’s more, the fact that these links mount down from above creates more open space beneath them for greater local ground clearance.

Here’s a closer look at the spring/shock mounting fork and how it mounts to a point on the lower lateral arm that is about 75 percent of the way out from the inner pivot. This creates a 0.75-to-1 motion ratio with respect to vertical tire motion for both the air spring and the adjustable damper.
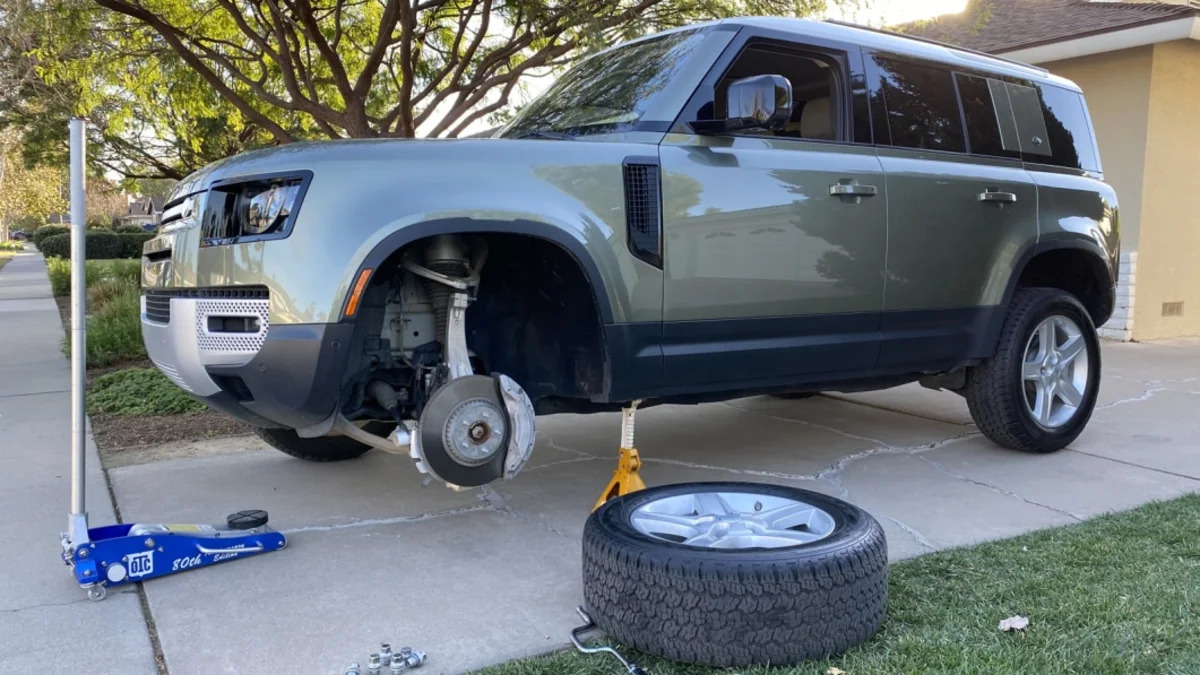
I really appreciate the clearly recognizable padded jack point (green) that makes it easy to figure out where to safely lift the truck in a place that keeps the jack stand mounting point readily accessible.

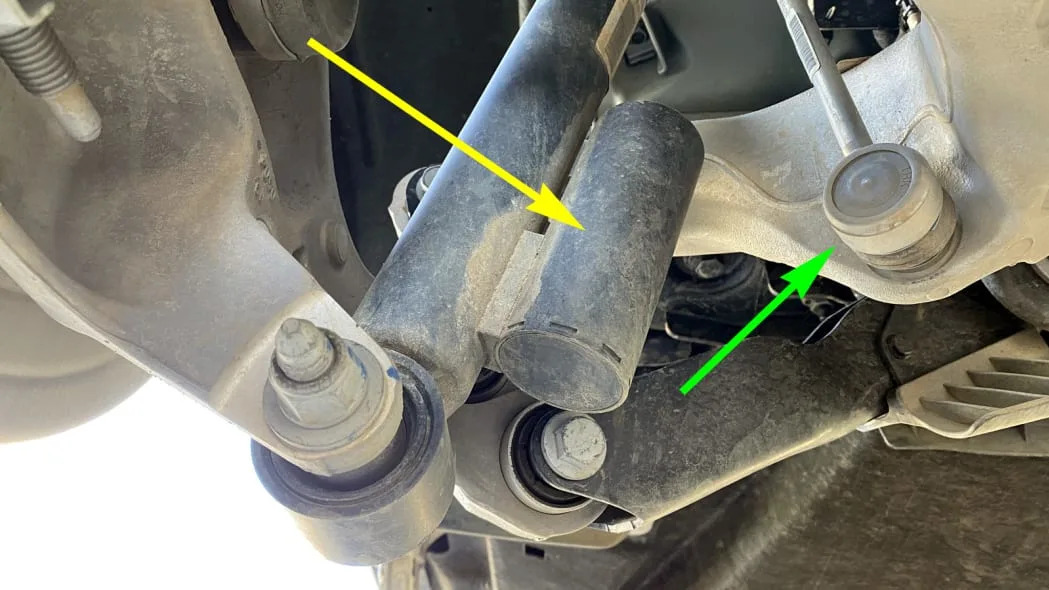
I have to admire the packaging density of this suspension. Here we can see how the stabilizer bar (yellow) snakes up and around the drive axle, then down to a low point that allows a connecting link (green) to mount high up on the shock mounting fork. What this means is the stabilizer bar has the same 0.75-to-1 motion ratio as the spring and shock because all three ultimately join to the lower link at the same point.

The upper control arm (yellow) is yet another aluminum piece, and its extreme high mounting point creates a long lever arm that lowers the stresses in the upper pivot points and upper ball joint.
![]()
This high-mount upper wishbone position, shown here at something approaching full compression with the tire back on, allows the pivot point to be farther outboard than it could be otherwise. The downside is that bigger tires won’t easily fit, and if you employ spacers or a different wheel offset to gain clearance you end up messing with all the work the suspension design engineers did to put the steering axis exactly where they wanted it. That’s an issue with most any off-road mod, but you’ve got fewer options here.
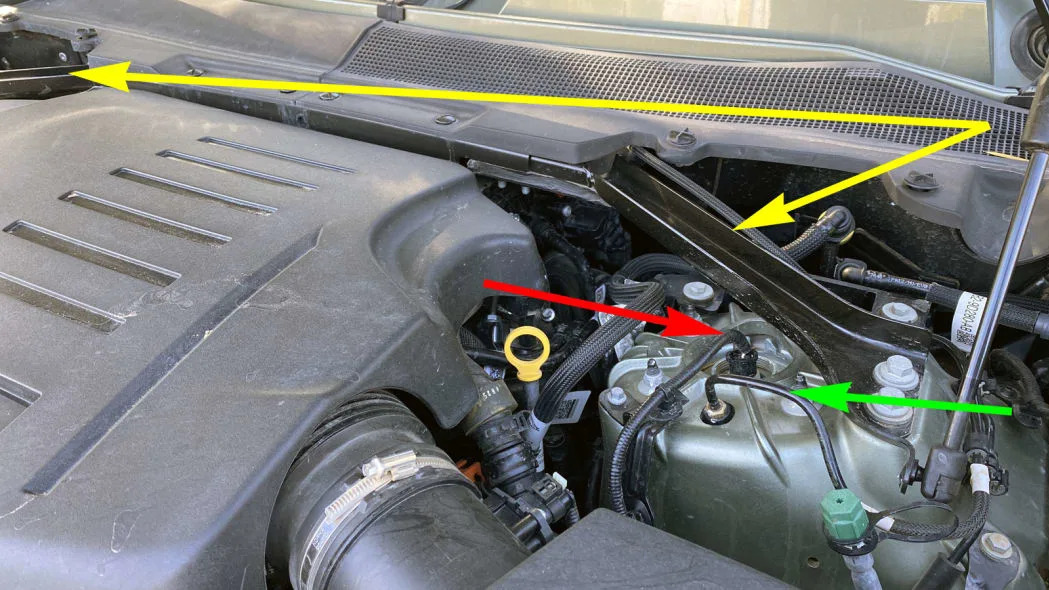
The upper end of the co-axial air spring and damper mounts to an underhood shock tower that looks pretty familiar. There’s also a stress bar (yellow) that ties the two shock towers to each other, as well as the firewall. Zoom in closer and you’ll see an air line (green) feeding the air bag, and a control wire (red) that goes down the center of the shaft of the damper to regulate the adaptive damping.
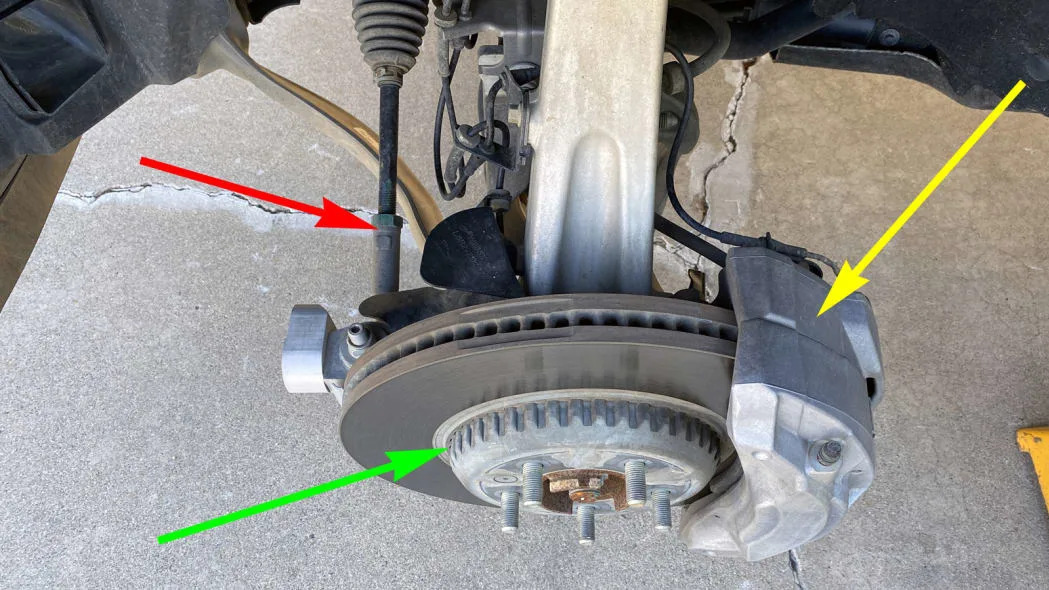
There’s more going on here than you might imagine. First, that’s a 4-piston fixed caliper (yellow) that’s made of aluminum. The rotor is a two-piece design, with a toothed hub (green) that allows the rotor to float laterally to quell vibration. The caliper is mounted aft because the steering (red) acts forward of the axle shaft — a configuration that’s common when front-mounted engines are set longitudinally.
But I know what you’re thinking. What’s that lump bolted to the steering arm? It seems too light to be a mass damper. It’s also suspiciously lined up with a prominent ridge cast into the caliper itself.
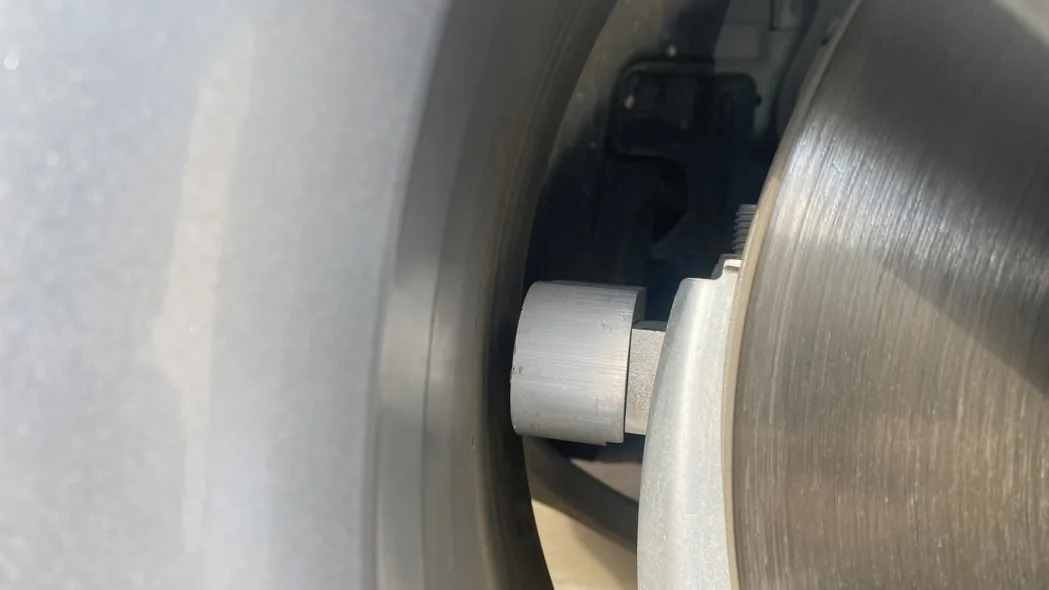
With the wheel back on, you can see it comes very close to the barrel of the rim. That tells me this is a mud scraper, there to keep debris from wedging between the caliper and rim on the other side. The ridge on the caliper cast seems like insurance.
Back at the rear, we again see something that’s pretty familiar. Range Rovers and Defenders have this arrangement, and it’s even similar to the back end of the Jaguar i-Pace. From here we can see an air spring (yellow), a shock absorber (green), and a single aluminum upper link (red).
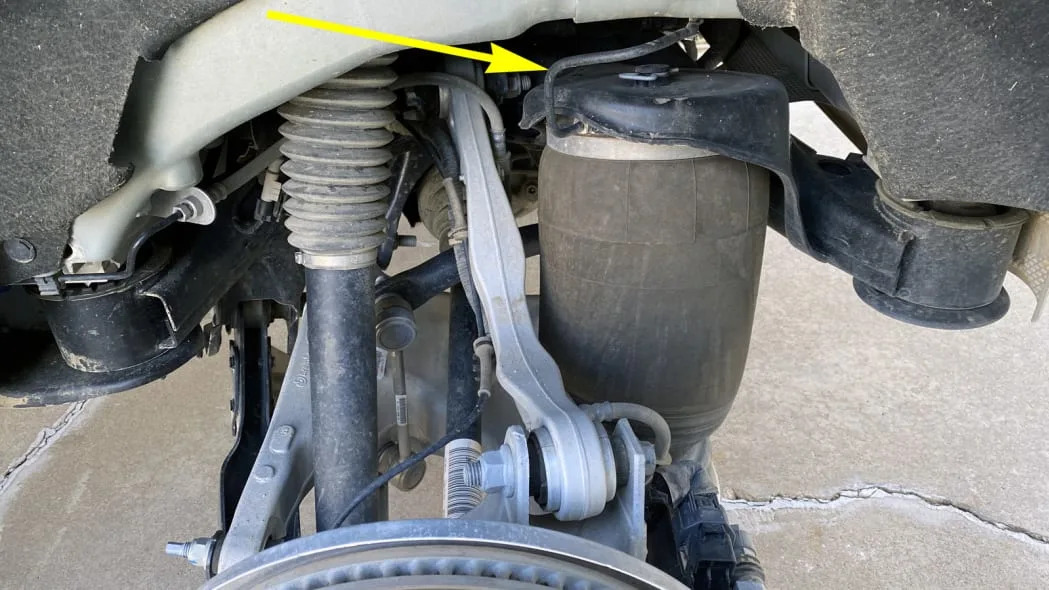
This view pretty much shows the same parts close up. The air spring seems to be held in place by a simple clip, and the air supply line (yellow) snakes in at the top. The lone upper link is fairly long, and curves up under the unibody.
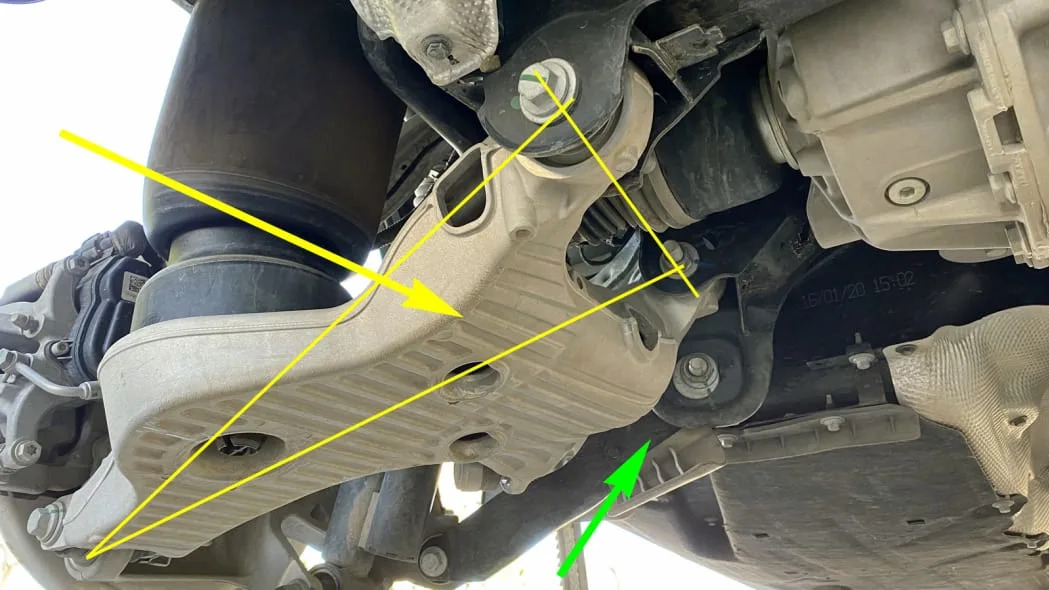
Here we can see a massive lower wishbone (yellow), with two inner pivot points and one connection to the knuckle. There’s another link forward of it, and it seems to have an eccentric cam (green) on its inner end, but it’s hard to make out what’s going on.
Here we can see how the forward link (yellow) attaches to the forward part of the knuckle, and how its eccentric cam must make it a toe link. The lower wishbone (green) attaches to the rear of the knuckle, so the two of them together are all that’s needed to keep the bottom of the knuckle properly positioned.
That’s fine, but what’s to keep the top of the knuckle from flopping around? After all, we only saw one link up there.
This short black link (yellow) is called an integral link, and it does that job. It also gives this suspension type its name: integral link suspension. Brake and acceleration torque can not cause the upper end of the knuckle to twist about despite the single upper link because the integral link puts a stop to it.
But the integral link has to have something to react against that torque, and that something is the lower wishbone we’ve seen earlier. But it’s not the A-shaped wishbone we usually see, it’s a H-shaped one, with a fourth arm (green) that’s twisted up into this high position.
This is all pretty genius from a packaging standpoint, but it’s not what comes to mind when I think of a long-travel off-road suspension. It does provide good ride comfort and predictable handling, though.
Meanwhile, the very long shock absorber (yellow) runs down between the legs of the H to bolt directly to the knuckle for a 1-to-1 motion ratio — less an insignificant smidge for its angle of lean, of course.
The rear shock absorber (yellow) has a piggyback remote reservoir, a move that increases the oil volume to help the shock run cooler over washboard dirt roads. We can also see the rear stabilizer bar link, but it mounts to the extra H-arm leg (green) that goes to the integral link, not the knuckle.
Here we can see that the motion ratio of the rear air spring is about 0.5-to-1 because it mounts roughly halfway between the inner and outer pivots. The stabilizer bar link, which is peeking below the edge (green), seems to be mounted about the same distance out, so I’ll give it the same score.
The stabilizer bar itself is mounted above the lower H-arm, and its pivot bushings are protected by heat shields (yellow) because they’re close to the muffler. Meanwhile, this is also a good view of the single-piston sliding rear brake caliper (red) and the electronic parking brake actuator bolted to the back of it.
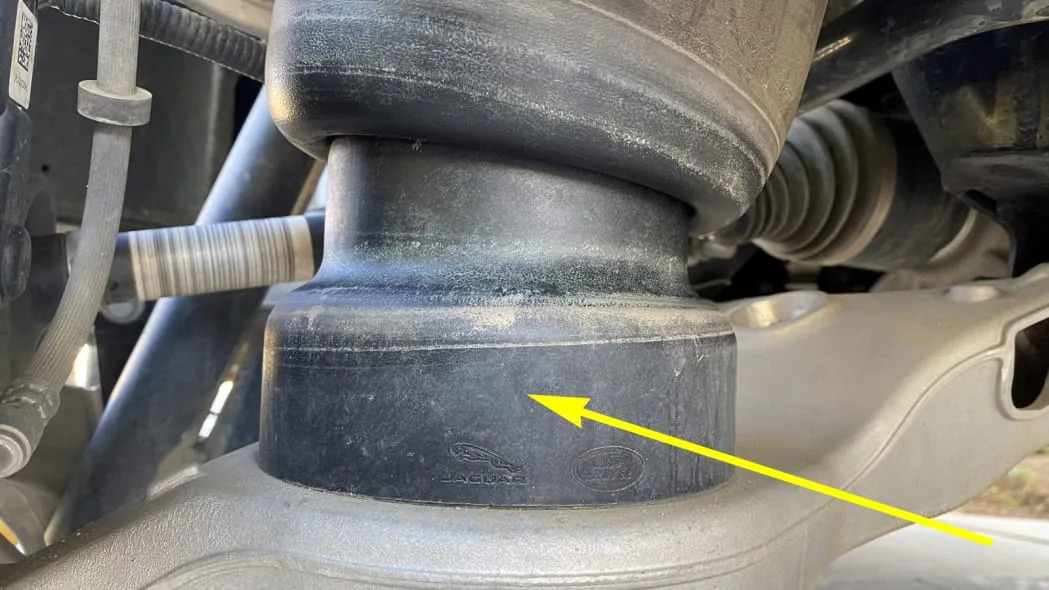
You can see from the witness marks how the spring bellows rolls down over what is called the piston (yellow) as the suspension compresses. Interestingly, the characteristics of an air spring — linear rate, progressive rate, etc. — can be adjusted by the profile shape of the piston. It’s not easy to say with certainty how this one is configured because we’re not seeing the spring at its normal loaded height, but the change in diameter near the bottom will tend to make it stiffen as it compresses.
The top of the piston could contain an internal bump stop that does its work inside the air bar, or the rear suspension bump stop could be located at the top of the shock absorber. Either way, we can’t see it, and I was not able to confirm which is correct with a Land Rover engineer.
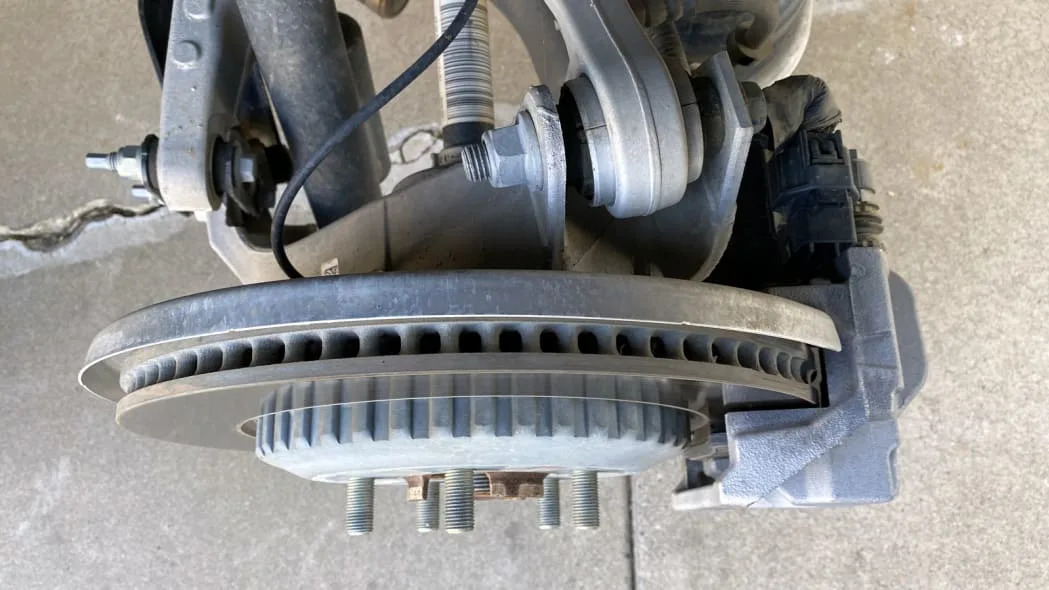
Like the front, the ventilated rear brake rotor uses a two-piece design that consists of a toothed hub and a floating rotor.
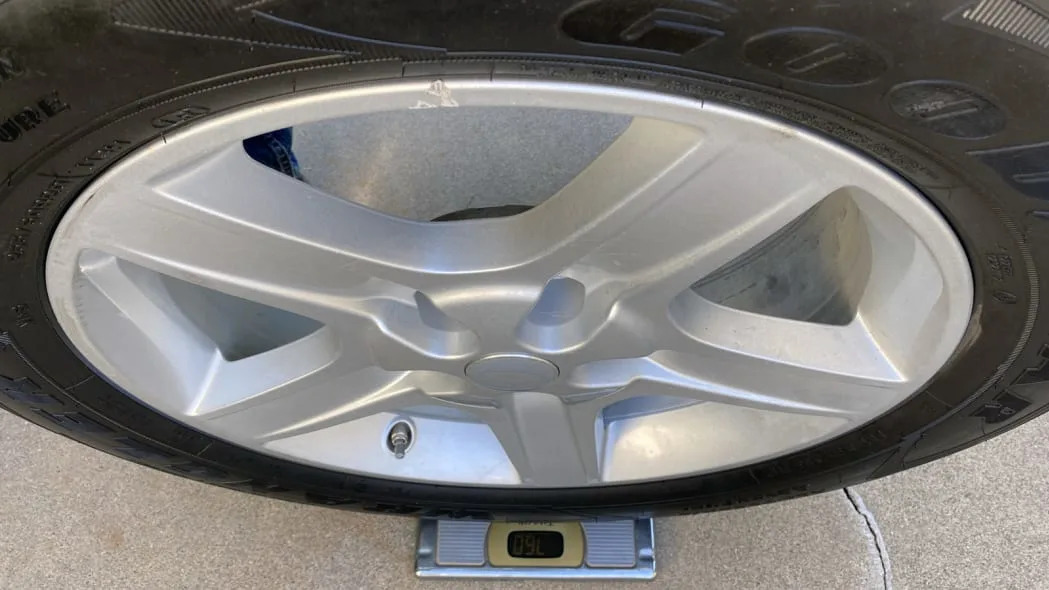
My Defender came on 255/60R20 tires — 32 inches tall, in old money — on 8.5 x 20” rims. The mounted assembly weighs 76 pounds. Big wheels and short side walls are not a great combination if saving weight is your goal, but I suppose it could have been worse. And there’s no denying the abundance of aluminum in the suspension that keeps total unsprung mass in check.
In the grand scheme of things, the underpinnings of the new Land Rover Defender 110 are no surprise if you’ve been following the recent evolution of the Range Rover and Discovery. In that family context, the Defender 110 fits right in. It’s nothing like the stripped-down Defender of old, but did anyone really expect it to be?
Related video:

Sign in to post
Please sign in to leave a comment.
Continue